Another year has passed.
It is time for all those resolutions.
If we make them, let's hope we keep them - at least for a few months.
I have been thinking about a word for 2018. I think my word will be contentment. I will try and be content in everything I do and in everything that happens.
I know that will be hard. It seems we are never content. But, I will do my best and try.
I grew up with many superstitions.
On New Year's Day we always ate cabbage, and in that cabbage was a piece of silver. We still keep this tradition, but I don't usually put silver in it.
People cook cabbage differently. My daughter-in-law's family cook apples in their cabbage.
Click here to see how my husband cooks our cabbage.
My grandmother believed in first-footer. The first one to set foot in her house on New Year's Day had to be a male. If you went by it precisely - a tall dark-haired male. It would bring you good luck and prosperity. I read somewhere that this was a Scottish tradition. We are Scotch-Irish, so maybe this is where Grandma McMillion came by this tradition.
Can you leave a comment telling us New Year's superstitions you grew up with? And, do you still go by them?
Or, perhaps leave a word for 2018 or a resolution you will try to keep.
Happy New Year!
Sunday, December 31, 2017
Thursday, December 14, 2017
Oh, Christmas Tree
I finally got my Christmas tree up and decorated.
I couldn't decide whether to put vintage ornaments or homemade ornaments on it. I love both!
So, I decorated with both.

 |
| vintage ornaments + snowmen from jar lids and old wooden spools and vintage quilts |
 |
| more from old quilts, scrabble ornaments |
 |
| angel from page from song book and I love the vintage one where the heat from a light makes the inside wings go around and around |
 |
| gingerbread baker from small lightbulb, handmade sheep and santa. |
 |
| wreath made from vintage ornaments |
Below are some links to posts from previous years on making Christmas ornaments and crafts. Check them out. There is still time to make some Christmas magic.
Click here, here, here, here, here, and here.
Have you put up your tree yet?
Do you like homemade ornaments or new shiny ones?
Wednesday, December 6, 2017
Natural Christmas Decorating with Dried Hydrangeas
My neighbor (who is also my cousin) was taking up his hydrangeas last year and wanted to know if I wanted it to plant in my yard.
"Yes!" I said. I have a snowball bush, which is similar, but I had always wanted a hydrangea.
It really too off this year and grew huge. The flowers are dried now and I went out to trim the bush.
I got an idea! Why not spray paint them red and stick them in my outside flower pots.
So that is what I did. The project turned out great. I think they are very pretty - and Christmassy.
They went from ugly . . .


to beautiful!


What do you think?
If you have some dried-up hydrangeas, you might want to give it a try.
Friday, November 17, 2017
Old-Fashioned Day
We volunteer at the local senior center.
On Wednesday, they had an Old-Fashioned Day.
Great Fun!
 |
| My cousin and I are wearing our old-fashioned outfits |
Members brought in food to eat - pinto beans, fried potatoes, cornbread, biscuits, pickled corn, fudge, applesauce stack cake, etc.
It makes your mouth water just reading those foods.
We played games (marbles, jacks, two-legged race, etc.)
I hadn't played jacks since I was a kid - and I won!
Teresa, the site supervisor, told origins of old-fashioned sayings and traditions.

We had a guessing-game table filled with old-fashioned items.

How many can you name?
I demonstrated a button yo-yo.

I also made these rag, mop and hanky dolls for prizes, and donated one of my cookbooks (since it has some old-fashioned recipes in it) for a prize.


Everyone Had a Great Time!
These dolls are very easy to make. Use a Styrofoam ball for the head. Tear your favorite material (cotton prints or muslin) into approximately 1" strips. If you use a yard of material, you can get around 36 strips, which is plenty. Lay them out flat on a table or floor and tie a string around them at the middle point. Put the Styrofoam ball under where you tied them together, spread out the strips of material (making sure to cover up the ball entirely) and tie a strip of material tightly around the neck.
Braid 3 to 6 mop strings or torn pieces of material together and knot the ends to make the arms. Separate her 'skirt' in the middle, slide the arms through and then tie a strip of material tightly beneath her arms to make her waist.
If you want, you can glue a piece of lace around her neck.
And make a kerchief for her head by cutting a triangle piece of material.
Hope you enjoyed my old-fashioned post.
Monday, October 23, 2017
Making Molasses in the Hills of West Virginia
It is that time of year.
The time of year to make molasses.
A few weeks ago we went to the annual Liberty Lions Club Molasses Making.
Below is a pictorial slide show of each step in the process.


Above is the last step. The finished molasses is piped out of the bottom of the big pot into quart or pint canning jars and put on the shelves to purchase.
It is a time-consuming process, but well worth the effort put into it.

They also made apple butter in a big copper kettle.
I have fond memories of making apple butter in
Grandma's yard when I was young.

The molasses tasted delicious (they let you taste test a spoonful of it). We bought two quart jars of molasses, but didn't buy any apple butter. I make my own apple butter in a big pot on my stove.
It was a fun and learning experience.
Saturday, September 23, 2017
Building a Maypole
It is the time of year when people are celebrating Oktoberfest.
What better time (except for maybe the month of May) to display a Maypole.
Maypoles originated in Germany. This year my cousin and I again worked in the German Village at the Mountain State Art and Craft Fair at Cedar Lakes, WV.
We built a Maypole from scratch to display in the village.
First you need a pole. My son went out into the woods and cut down a very straight tree. It was approximately 4 inches in diameter. He cut off the limbs and sawed it to be a length of 10 feet -- If you are unable to get into the woods, you could also use a 3" or 4" diameter PVC Pipe. They are not very expensive to buy.
Obtain flowers . . .

Ribbon . . .

(2) 12" Metal wreath forms . . .

Tie the ribbons securely to the wreath form.

Attach the flowers


Dig a hole approximately 2 feet deep to place the pole in. Firmly tamp the dirt around it.
Screw through the wooden slats, that are attached to the flowered wreath, to secure it to the top of the pole. You don't want the wreath to turn.

In addition to dancing around the Maypole, they make for a great photo op.
You see from the pic how pretty the ribbon looks twirled around the pole after people have danced around it.
Enjoy the fall!
Friday, August 18, 2017
A Busy Summer
Summer is very busy around here.
I decided to take a break and show you a little of what we have been doing.
Be sure to click on all the links to recipes. I've included a lot.
We took a quick trip across the Ohio River to get corn to freeze.


They grow nice corn on the farms along the river.
So far we have put up 10 large and 8 small bags of corn cut off the cob. Go here to see how to make corn cob jelly and here to see how to freeze corn. .
Our grapes are doing great this year. I can't remember exactly when we planted our vines, but they are 20 to 30 years old, at least. One of the vines died last year. I was afraid we were going to lose all four of them. We were only able to pick a handful of grapes. When my husband pruned them early this year, he left the small vines growing from the old ones. Wow! We have a bumper crop.
Go here to see where I posted about making jelly and here to make concord grape pie.

So far I have made four batches of jelly and put up three quarts of juice.

I don't know what I would do without this juicer, it is a time saver, for sure. It extracts the juice by steaming the fruit. I love it!

We also have a bumper crop of tomatoes this year. The vines are so large, I find it hard to see all the ripe tomatoes hidden in them. I usually peel, cut up and cook them for 20 minutes, allow to cool and then freeze them in quart freezer bags. We then use them to put in soups, chili and make creamed tomatoes. Click here for a recipe.
Our one plant of squash has outdid itself. I have made squash bread, delicious squash pies, casseroles, fried them and froze them.
Go here to see a couple of squash recipes I posted a few years ago. I'm not really crazy about freezing squash, but I shredded a few and put 2 cup portions of them in pint freezer bags to use later in recipes. I also sliced some, froze them spread out on cookie sheets and then put them in bags. I'll get them out in the fall and winter, quickly cover them in corn meal and fry them while still frozen.

I have also been picking blackberries and putting them in the freezer. Click here and here to see some recipes I've posted using blackberries.
To relax, we watch the birds and squirrels, visit our creek and watch the wildlife and decorate rocks (among other things).


What have you all been doing this summer?
Monday, July 10, 2017
Road Trippin' in West Virginia
Charley and I and two of our sons took a little road trip on Saturday.
We drove along the Midland Trail.
Our first stop was at Kanawha Falls.
This is where the New and Gauley rivers
converge to create the Kanawha River.
Click here to read a little about the falls.


On up from Kanawha Falls this house sits out in the river on a rock.

Up the road a little ways we reached Cathedral Falls.
It sits back in a natural rock amphitheater.

My boys taking in the view.

A lot of people visited the roadside park today.
There is a small parking lot
and picnic tables.
You can hike a path that takes you to the top of the falls.
But, no I did not take that hike.

Click here for a few pics of the falls in winter.
After enjoying the falls, we drove up, up, up
the winding Midland Trail
to Hawk's Nest State Park.
As always when you go road trippin', you sometimes
have to visit Ye Olde Bathroom.
Pretty cool bathroom, don't you think.

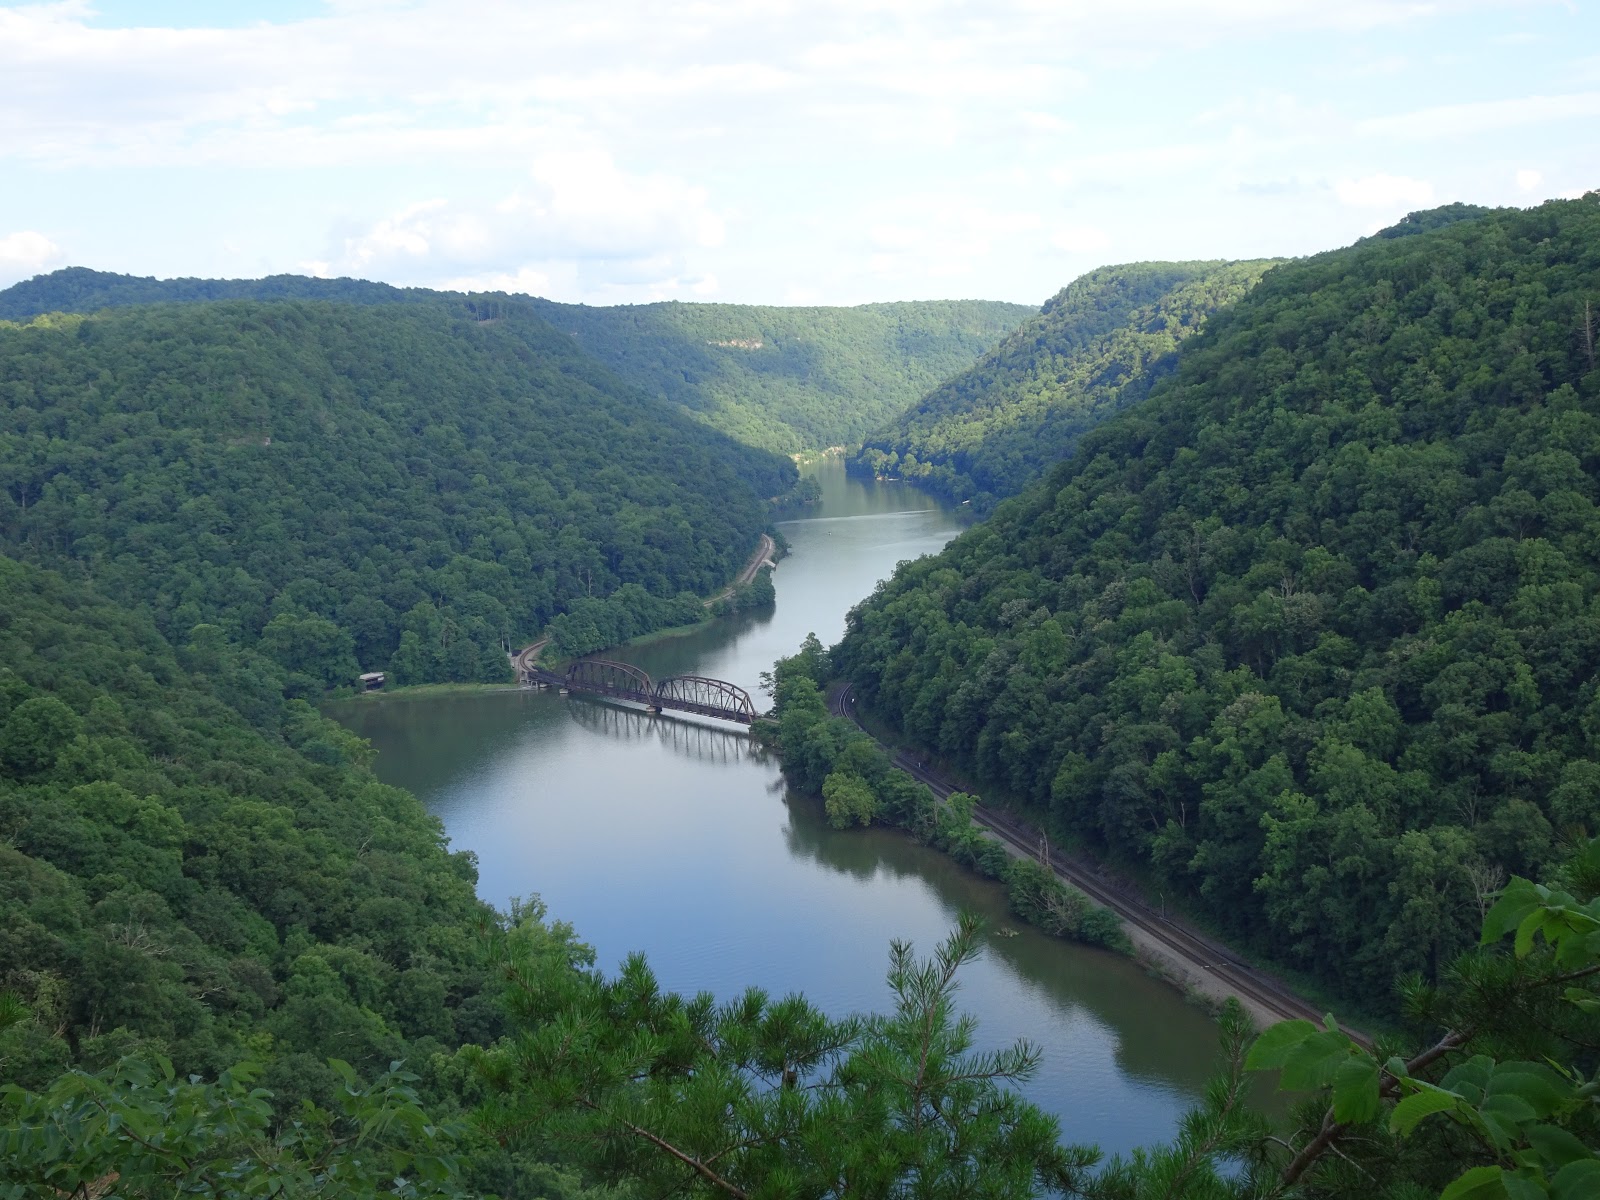
The familiar, breathtaking view of the New River Gorge
from Hawk's Nest overlook.
On the way back, we drove through the small town
of Montgomery, WV
and stopped at the local Dairy Queen.
This was the view from their parking lot -
an Osprey's nest on top of a cell phone tower.


We enjoyed our 7-hour trip up to Hawk's Nest and back.
Have you been road trippin' lately?
Ever been to wild, wonderful West Virginia?
Subscribe to:
Posts (Atom)