Showing posts with label ornaments. Show all posts

Saturday, December 10, 2022

Pretty Gumdrop Ornaments

THIS IS A RE-POST FROM 2008


I've got a table at a small craft show this weekend. I've been making, among other things, ornaments to sell.

Here are steps to making pretty gumdrop ornaments.
Supplies needed: paint (color or your choice), glue, 22 gauge craft wire, egg shape Styrofoam, glitter, paint brushes, toothpicks, serrated knife, small wire cutters
Cutting the Styrofoam with serrated knife.
Cut a short piece of wire, bend in half and twist the bottom ends around each other. Dip in glue and push into rounded top of Styrofoam. This will be the hanger.
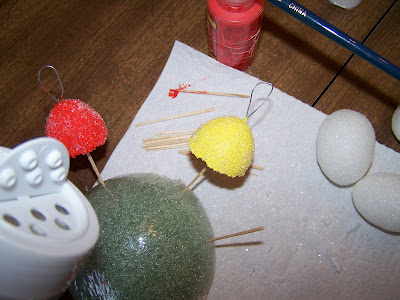
Paint bottom of gumdrop and sprinkle with glitter while paint is still wet.
Insert toothpick into bottom of gumdrop and paint the top.
Stick gumdrops into something to dry (I used another piece of Styrofoam) and sprinkle top of gumdrops with glitter (again, while the paint is still wet).
Here are the finished gumdrop ornaments. They look good enough to eat.....but don't!
I also made little gumdrops with the small cut off ends of the Styrofoam. These would be cute hanging on a small kitchen tree. I like the orange best, what's your favorite?

Friday, December 19, 2008

SHOW AND TELL FRIDAY - Christmas Ornaments

For my Show and Tell Friday Post, I decided to post some of the ornaments I hung on my Christmas Tree. I have a small tree this year and have no room for many home made ornaments that are still packed away, but this will show you a sampling of them.


Here is my angel tree topper. I made this from an old cone that thread was on. She has snowflake wings, yarn hair with a side ribbon, pretty detailed face on a painted wood ball, bead necklace, lace bodice and buttons down the front. It fits nicely on top of the tree. I love her!


Here is a felt reindeer with cinnamon stick antlers, a bowling pin snowman, the cardinal and dove are made from felt and the angel is made with an icicle ornament with her wings shaped from red ribbon.


Here is a Santa with a mop beard and one of my cinnamon stick scrabble ornaments with David's name on it.


Here is a snowflake ornament made by my cousin Vera at Intouchwith, a Santa's list ornament made with a small wooden spool with list attached, a quilted birdhouse made from a vintage quilt piece with a cardinal on it (one of my favorites), in the low left hand corner is a gingerbread girl made from a lightbulb, and an open Christmas ball I put glitter on and inserted moss and a cardinal.


Here is an elf made from baby blocks, a snowman on the left made from a pine cone, a Santa made from a dowel rod, a pretty sheep made from wrapping yarn around a card stock cutout .


Below is an angel made from a craft stick, a hobby horse from a cinnamon stick, a gingham wrapped candy cane, and in the bottom an ornament made from one of my mom's old wooden spools (I love those because they were my mom's old spools and I made quite a few of them).


Here is one of my cookie cut out ornaments I made from an old quilt, my birdhouse I made from a napkin holder, a close up of my felt dove.


Here is a close up of the felt cardinals, a wooden birdhouse I stained and glued pearls and wedding bands on (this would be good to give newlyweds), and a stuffed heart I made from an old piece of material.


Hope you enjoyed some of the ornaments hanging on my little tree. The ones I showed are all hand made.

Now go over to Kelli's site to see everyone else's Show and Tell Friday posts.

Wednesday, December 10, 2008

COOKIE CUTTERS & CINNAMON DOUGH ORNAMENTS

I love cookie cutters! I love cookies! I love cinnamon!

I can't believe I love all those things and have never made cinnamon dough ornaments before.
My children did them when they were in grade school and I still have the ones they made.

They smell delicious, but don't eat them!

There are lots of recipes for them on the internet. This site has 99 recipes for them!

This is how I did it:

1 cup cinnamon
3/4 cup applesauce
2 T. white glue (I used Elmer's glue)

Bake for approx. 2 to 2 1/2 hours in a 175 - 200 degree oven.
Turn every 30 minutes to keep the edges from curling up.

You can get a huge container (18.3oz) of cinnamon at Kroger's for $5. You may be able to get it cheaper somewhere else, I don't know.


First decide what cookie shapes you will need. Do you think I have enough to pick from?


I also have some vintage cutters that I like.


Here are a few different ones that you might like to try. Dog biscuit, hand, foot, car, cowboy hat and cowboy boot.


Here are the ingredients:


Mix together, it will look a little like cookie dough.


Work together with hands into a ball, cover with plastic and let sit for 1/2 hour.


Roll out onto wax paper (sprinkle a little cinnamon on the wax paper if you wish).
Put a layer of wax paper on top of the mixture. Roll out with rolling pin until 1/8" or 1/4" thickness.


Cut into shapes. I chose stars, snowflakes and hearts. Take the scraps, work them into a ball again and roll out to make more cookies. Use new wax paper each time. Lift the cookies up carefully.


Insert straw into cookie to punch hole to hang with.


Put them into the oven. The original recipe said bake at 200 degrees for 2 hours. Turning them over after 1 hour to prevent curling of the edges.
I started out at 200 degrees, but after about 1/2 hour I reduced it to 175 degrees. I kept them in for around 2 1/2 hours and I turned them every 1/2 hour. Still, a few of mine curled a little at the edges.

This recipe made 24 cookie ornaments. The amount will vary according to the size of your cookie cutters.


With a ribbon.


I think they turned out pretty good. If you are not impatient (like me) you can let them dry naturally. It will take 2-3 days and you need to turn them a couple of times a day.

Most recipes said to store them in an air tight container or zip bag until next Christmas.

Thursday, November 6, 2008

I'm Crafting!

Well that time of year is here when I get in the mood to craft.

The following Christmas crafts were made from yard sale and/or thrift store finds.

I bought a Badge a Minit at a thrift store last year. It came in a box with lots of supplies and I think I only paid a dollar for it. I love it!

I'm making Christmas badges. The snowflake, trees and angel were made from Christmas material I got at yard sales. The gingerbread face is a graphic I resized from Craftymugs site. I think I am going to make some from Christmas wrapping paper, too.


This next craft is an icicle ornament. I got a box of plastic icicles at a yard sale. I've bought the glass ones before, also. They work good for this craft, too.

Supplies needed: icicles, 22 guage wire, ribbon, decoupage, glitter, and blue beads.


Step One: Put decoupage onto the icicle.


Step Two: Sprinkle glitter onto decoupage.


Step Three: Cut off a length of wire, insert one end into hole at top of icicle, bend into any shape you want for the hanger.


Step Four: Make a bow out of your ribbon. It would be better to use a smaller width ribbon than what I used. I used the wide ribbon because that is what I had on hand. I folded it in half to make it smaller.


Finished ornament. I also glued a blue bead on the end of the hanger.


Next are high heel ornaments. I thought these would look good on a Victorian themed Christmas tree. I found a box of these glass high heels at a thrift store. As soon as I saw them, I said to myself "These would make great ornaments!"

Here is what you will need: the glass high heels, pearl beading, small bunches of flowers. The beads and flowers can usually be found at Wal Mart or a craft store. I'm sorry, but I have no idea where you can find the high heels.


Here is a close up of the glass high heel. They were in a box of 12. I only paid 50 cents for the entire box.


I used a glue gun to attach a single flower at the bottom of the shoe. I cut a length of the pearl beading and hot glued both ends underneath the shoe where the heel is for the hanger.


I hope you enjoyed these crafts. Try making some for your tree. They are very easy to make.

Thursday, October 9, 2008

Birdhouse Ornaments

In my post about yard sale treasures I mentioned getting some wooden birdhouse napkin holders.

I had no intention of using them for what they were intended for. Here is a before picture.

You are probably wondering why I would mess with these pretty napkin holders. Well I don't use napkin holders. So I decided to paint them and make ornaments out of them.

Step 1: Paint. It took several coats


Step 2: Going from top left -screw small eyelet in roof for hanging, top right - adding moss for nest, bottom left - adding snow, and bottom right - adding ribbon and greenery.


Step 3: Finished product

I love to craft and I am going to try to do crafting posts at least once a week. Bookmark me and come back and check often if you like to craft.