Showing posts with label fall decorating. Show all posts

Thursday, October 20, 2016

Small Town - Colorful Fall Decorations

Our small town of Ripley, WV gets into the fall and Halloween spirit this time of year when local organizations decorate the lamp posts.

Yesterday I took a few pictures along the streets of Ripley. I didn't get pics of all of them, but I took enough to get you into the spirit of the season, too.

This little fella sits on one of the side streets.


This scared ghost is near the steps of our courthouse.

I like this one. Looks like a witch had a bad day. In the background you can see one of the little libraries which are located throughout Jackson County.


Are you in the fall spirit now after walking around town with me?

I hope so.


Tuesday, October 6, 2009

This and That

Sorry I haven't posted for a week. My how time flies.

There's not much happening out here in my neck of the woods. We've had a few visitors. On Sunday in addition to my son and daughter in law visiting, we looked out our front door and saw this handsome creature staring at us.


And on Saturday there was a bad wreck on the interstate and they detoured the traffic from I-77 onto Rt. 21 for over 2 hours. We had constant traffic on our road in front of our house. In addition to the hundreds of cars, we had tractor trailor traffic which we rarely see on our road any more.


We had what I call my 'little alien' visit me over the weekend. I hope you never accidentally bump into this little creature. It hurts! I was doing a little fall cleaning in my blackberry patch when the top of my hand started to sting. I kept searching until I found my 'little alien' under a leaf. It hurts like a wasper sting! I looked him up on the internet and his official name is 'saddleback caterpillar'. Zoom in on him for a closer look, he's weird!


Fall is arriving in spurts here and there at our house. . . this pitcher is old. I believe someone tried to imitate Fiestaware.


My kitchen table sports my peanut and candy corn mixture (which is just about disappeared now) and peanutbutter kisses cookies (which have already disappeared) on top of an old fall placemat.


Fall arrived outside this morning, too. The thermometer on the deck said 40, but the housetops said something different. It's a little blurry, but it sure looks like frost to me.


What have you been up to lately?

Friday, October 10, 2008

Fall Crafts

Ok, I made a couple of things today that I wanted to show you.

One of them is a remake of something I got at a yard sale this morning.

Here is the before picture.

Talk about recycling, it's made out of a tree branch! She had bought it at the Arts and Crafts Fair at Cedar Lakes. You can't tell in the picture very good, but there are two bird nests with birds and of course the ivy going down the limb. I thought it was a very good buy for just $3. (The Mountain State Arts and Crafts Fair is held every year during the 4th of July week at Cedar Lakes at Fairplain, WV. It was started in 1963 in celebration of West Virginia's centennial.)


Here it is stripped of the ivy and ready for me to redecorate for fall. I left the bird nests on them. I will just cover them up later.

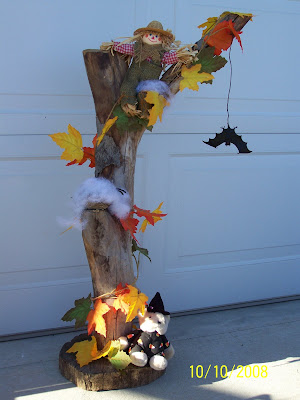
Here is the new fall version of my tree limb.


Isn't it cute. After Thanksgiving I will redecorate it for winter. I think it was a pretty good investment, don't you?

NOW FOR MY SECOND CRAFT.

I had been wanting to make a clay pot scarecrow for a long time. I saw one at a yard sale a few weeks ago and they wanted $25 for it. I made it for a lot less.

Step one. Here is what is needed for this project. As you can see the large clay pots are old ones I had already. They are not in the best of shape, but I figured my scarecrow could be shabby chic. You can buy all new pots if you want.

Step two. Putting it together. I cut out a collar for his neck out of yellow and orange felt. And you probably already know this, but you cannot use hot glue on this project. It will not stick to clay pots. I used Alene's tacky glue, and it worked just fine.


Step three. I had a container of fall leaves I had bought at a yard sale a while back and I glued them where the clay pots came together. My pots weren't in very good shape and this helped to hide the imperfections. You could buy a bouquet of artificial fall leaves at Wal Mart and take the leaves off and glue them to the pots.

Step four. To me the arms were the hardest to do. I used 2 3/4" pots and strung twine through the holes in the bottom of the clay pots. Cut off a long piece of twine and tie large knots in it so the clay pots will not come off. Getting them tied in just the right place is a little tedious to do, but with a little trial and error you can do it.

Step Five. Here is the finished scarecrow. Put the twine that holds the arms over the large clay pot that the head rests on. Glue the small pot on top for the head, glue some raffia on the sides for his straw hair and glue the straw hat on top of that. Draw on a face with a black sharpie and finish decorating any way you want. On the very bottom I glued twine around and around about 6 or 7 times. I glued leaves here and there. You can use any size clay pots you want to use, just make sure the bottom three are the same size. Use a smaller one for the head and even smaller ones for the arms.

I hoped you enjoyed these projects. Just about everybody has clay pots sitting around and if you live near the woods you can go out and find dead branches on the ground.

Happy fall decorating!

Wednesday, October 1, 2008

Quilting a Maple Leaf

I was sorting through my fall pot holders a few days ago and got an inspiration for a small autumn throw to put on the back of my chair.

Here is a picture of the potholder:


It looked like a simple enough pattern to make and I needed a small autumn throw. There are many sites on the internet that tell you how to make the maple leaf quilt block. I made this without consulting them, that was my first mistake.

I cut my blocks all the same size (that was my second mistake) and then cut some diagonally for the two toned pieces.

Please don't make the same mistakes! If you are going to make this throw go to this site (or the many other sites for maple leaf quilt blocks) for measurements and I would probably double the measurements they give on this site for a large one like the one I made. I also put a 4" border around mine. My entire project is approximately 31" square. You can make yours any size you want, just be sure to make the solid squares smaller than the ones which will be cut in half diagonally.

Here is my material. I got it at WalMart. I thought the gold would be pretty for the leaf and the dark green for the border, it matched the green in the leaves. You can use muslin or any material you want for the backing.


Here is one strip of blocks sewed together. I made a stem out of the green material and sewed it on top of the block.


And here it is all sewed together, layered on the backing and batting, and pinned for quilting.


The finished product hanging over the back of my rocking chair. Not perfect, but pretty. I'm thinking the throw would be nice on an end table or table top, too.


This would be a breeze for those of you who quilt. I finished it in one day (even with the mistakes I had to fix along the way). I put it in a large embroidery hoop and I hand quilted it. I am not a good hand quilter, but I made it and it is quilted with love, uneven stitches and all. I like small and quick projects, and this fit the bill.

I plan to make another one for my other chair and a double one to put on the back of my couch. Maybe if I follow instructions this time, it will be easier and turn out better.

Hope you liked my feeble attempt at quilting. This is to show you that even a novice can sew a simple and easy quilt for your fall decorating. I'm not good at instructions, but I thought this would give you an idea or inspiration for an easy project you could make.

Anyone going to give it a try?